


Office Chair Cylinder Replacement with Removal Tool (As Seen On PBS) - Heavy Duty Pneumatic Gas Lift Piston for Desk Chairs and Gaming Chairs - Universal Fit Black
Details
- BrandThe Office
- ColorBlack
- MaterialAlloy Steel
- Extended Length4.75 Inches
- UPC760842156357

Description
🪑 Elevate Your Seating Experience!
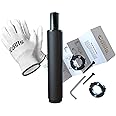
- COMPLETE KIT - Includes removal tool, gloves, and step-by-step instructions.
- UNIVERSAL FIT - Compatible with most office chairs, including premium brands.
- REVIVE YOUR CHAIR - Transform your sinking chair into a throne of comfort!
- RISK FREE GUARANTEE - Lifetime warranty ensures your investment is protected.
- HEAVY DUTY PERFORMANCE - Class 4 cylinder supports up to 1000 lbs without fail.
The Office Oasis Office Chair Cylinder Replacement is a heavy-duty pneumatic gas lift piston designed for desk and gaming chairs. It features an industry-standard size for universal fit, supports up to 1000 lbs, and comes with a unique removal tool for easy installation. Backed by a lifetime warranty, this product is perfect for those looking to extend the life of their office chairs without the cost of a new one.
Specifications
| Brand | The Office Oasis |
| Color | Black |
| Product Dimensions | 2"D x 2"W x 15.13"H |
| Size | 4.75" (120mm) Stroke |
| Back Style | Solid Back |
| Special Feature | Adjustable Height |
| Unit Count | 1 Count |
| Recommended Uses For Product | Office |
| Maximum Weight Recommendation | 1E+3 Pounds |
| Style | Cylinder Replacement Kit |
| Pattern | Solid |
| Room Type | Office |
| Age Range (Description) | Adult |
| Included Components | Chair Cylinder, Cylinder Removal Tool, Gloves, Installation Instructions |
| Shape | Cylindrical |
| Model Name | Office Chair Cylinder Replacement |
| Arm Style | Armless |
| Surface Recommendation | Hard Floor |
| Furniture base movement | Swivel |
| Indoor/Outdoor Usage | Indoor |
| Reclining Position Count | 1 |
| Tilting | No |
| Is Customizable | No |
| Is Foldable | No |
| UPC | 760842156357 |
| Form Factor | Metal |
| Manufacturer | The Office Oasis |
| Item Weight | 2.5 pounds |
| Item model number | OAS-2010 |
| Is Discontinued By Manufacturer | No |
| Grade | Class 4 Cylinder |
| Material Type | Alloy Steel |
| Number of Items | 1 |
| Manufacturer Part Number | OAS-2010 |
Have a Question? See What Others Asked
Reviews
S**G
Solid product — saved me hundreds vs. buying a new chair
First off, I’m genuinely impressed with what I received. When I saw the “As Seen on PBS” messaging, I almost skipped it — that kind of marketing feels tired and gimmicky to me. But since I have Prime, I figured I’d give it a shot and return it if it was junk. I’m glad I didn’t.The included removal collars are no joke — solid metal, well-built, and honestly so nice that I’m thinking about how to repurpose them instead of tossing them. The instructions were clear and easy enough to follow, though the writing could be a bit more polished for clarity. Still, if you approach the removal process logically, most people should have no trouble.Pro tip #1: If you have a small ratchet and hex socket, it’ll make the job faster. They include an L-shaped hex key that works fine, but a socket wrench speeds things up.Pro tip #2 (learned the hard way): Don’t align the removal collars. I accidentally did, and the long bolts ended up threading into each other instead of pushing the collars apart. Rookie move.The cylinder fit perfectly in the chair I bought from Ocean State Job Lot (formerly Odd Job). It gave new life to my office chair and saved me hundreds compared to buying a new one.
S**N
Office chair hydraulic replacement.
I am very pleased with this product. It came with the tools necessary to remove the old hydraulic. It was easy enough to do the replacement once I figured out I needed to wipe off the column much better and tighten collar "B" much tighter. I would recommend using some rubbing alcohol to remove any residual grease from the post prior to placement of the collars.I would also recommend that you extend the post prior to installing the seat onto it. I did not do that and found out, the hard way, that my lever did not want to push down the button. After reading the final instructions, I also realized I hadn't removed the "purple" plastic cover. I was able to extend the chair, in spite of my goof. By extending the post before you put the chair seat on, you will have enough room to utilized the collars and pull the seat back off to adjust or remove the plastic cover; which I will be doing shortly.Bottom line, I am sitting much taller now and my hips and legs aren't aching due to having a chair that is too low to the ground. I am a happy camper! If you need to repair your office chair hydraulics, get this one!
A**R
Good replacement for Herman Miller Aeron cylinder
My 2002 Aeron cylinder blew (not bad since I sit in it every day and weigh 220, working from home for the past 2 years) so I was looking for a good replacement that didn't require ordering one through the local HM dealer. After evaluating many options I selected the Oasis kit - I looked at some two stage cylinders closer to the OEM but due to either shipment times or functional need (I don't need to go lower) this seemed like a good and affordable option. And the removal kit bits seemed like a good option after watching the numerous videos and reading plenty of forum posts about the difficulty removing old cylinders. Mine has been installed for 20 years, the past two with relatively hard use so I anticipated a challenge and it did not disappoint in terms of difficulty. I'll comment on the cylinder itself, and removal of the old cylinder as separate (but related) issues.The cylinder itself has worked great - as others have noted it does not sit in the base of the Aeron as deeply as the OEM cylinder, thus it does raise the maximum chair height by an inch or two. If this matters depends on the user - for me I wished for maybe another inch with the OEM fully extended - worked fine but the perfect height for my "desk" (a repurposed drop leaf table) would have been a bit higher. So this replacement works well - I have it lowered just a hair as the highest setting is a bit high for my situation but the flexibility is nice. Do note the instructions online for adjusting the lever screw that presses against the cylinder button - I did have to tweak mine a bit as the prior setting for the OEM cylinder was too long and resulted in the replacement not holding the height when seated but it's a quick and easy adjustment - works perfectly now. The button on the OEM part is shorter than the replacement so this was expected - but for anyone wondering the taller button on the Oasis does work with the Aeron!Removal of the old cylinder... I don't have a 12 or 14" pipe wrench and while I have a good assortment of tools wasn't that driven to get one for this project alone (since I've never needed one otherwise in 20 years of home maintenance). Prior to receiving this new cylinder I'd given removal of the old one a go using 10" slip joint pliers, vise grips, with no success. Soaked the joint with liquid wrench penetrating oil and was getting no result whatsoever. Not a budge. Again my old cylinder was well and truly lodged. So I was anxious to try the removal tool included with this kit and using it I was able to dislodge the seat from the post! So it does work - here are some tips for use: first my cylinder had spewed grease/oil when it blew so I found that just wiping the post with a dry paper towel/cloth did not get the post clean enough for the removal tool part that you clamp down to gain a solid grip. I used some simple green degreaser, then a run of rubbing alcohol to insure the post was really clean. Once I did that I was able to clamp down the collar (and do clamp it down tight!) and it held. At that point it was just a matter of slowly turning the "pressure" screws through the collar - 1/4 to 1/2 turn on one, then the other. I did find steady pressure on both sides worked well. If you go in smaller turns alternating each side you'll not need to apply a ton of torque to the allen wrench to achieve a result. I heard a fairly distinct pop when it first started to loosen and then it went pretty quickly - a few more turns and the seat detached from the post. So the removal tool does work with some patience and materials preparation. I've saved it for future use if needed. I do think it was easier than trying to torque it off with a wrench unless you already own a pretty long and heavy duty pipe wrench. Even then the screw pressure requires less oomph overall than even a pipe wrench I would think.Note that the removal tool gets the seat off but does not remove the old cylinder from the wheel base. Given the ability to use a mallet or dead weight hammer on the base (unlike the seat) it probably isn't needed but do expect to spend some effort getting the base removed as well. I used penetrating oil and a rubber mallet with little success. Here are my tips on that part of the job if yours is stuck. First expect to take some whacks at it - like maybe not 2 or 3 ;) I used the edge of my lower deck (around 2 feet off the ground) with some padding to make sure when it released it hit the ground and didn't take off a toe. You'll need a stable surface for sure. I decided to leave mine outside for an hour or two in 40s temps to shrink the metal and that seemed to help. I also alternated hitting the bottom of the cylinder with sitting the cylinder bottom on the deck and alternating hitting the base with a rubber mallet on opposing legs (which gets the benefit of the longer leg leverage, as well as some offset pressure to eventually break the seating). It did eventually release but it does take some time. Have patience!New cylinder install is super easy - I did put some "no seize" lubricant on each end of the cylinder to give some minor aid if I ever need to replace this again - whether it will help I don't know but can't hurt anything.
N**Y
Absolutely love this replacement cylinder
I’m a Nail Tech and own a very small Salon in a Suite. I’m continually going back and forth between pedicures and fingernails. I can’t even count the number of times I raise and lower my chair daily, so the poor thing was too tired to stay in the “up” position!I planned on buying a new chair during Prime Days, but could t find one I liked, so I ordered this Office Chair Cylinder Replacement. I was worried I wouldn’t be able to get the old cylinder out of the chair, but the REMOVAL TOOL saved the day!I flipped the base upside down on my lap, whacked the old cylinder with my trusty BFH, and it popped right off! You might not want to do that yourself as I hear those can be hard to get off, but it worked for me.The rest was easy! Inserted the new cylinder in the base and put the seat on top, and I was back in business! Operation is very smooth and it lifts a little taller than the original, which I like! AWESOME!
Common Questions
Trustpilot
3 weeks ago
1 week ago
